Sunday, 3 July 2016

Rose Gold Polka Dot Nail Art

Polka dot nail art is the perfect design to create if you are a nail art newby or don't have much time to spare. Pale pink and rose gold is one of my favourite combos.

Rose Gold Polka Dot Nail Art

What will you need?

All you will need to create this look is a pale pink and rose gold polish, a dotting tool and some matte top coat.
The polishes I used were Essie 'Fiji', Models Own 'Chrome Rose' and Illamasqua 'Matte Top Coat'.

Step By Step Tutorial:

Step 1: Begin by painting all nails in two coats of the pale pink polish to create an opaque base.

Step 2: Take the rose gold polish onto a dotting tool and add polka dots neatly over the nails.

Step 3: Wait a few minutes for everything to dry and then take the matte top coat, adding a layer to each nail.


And there you have your Rose Gold Polka Dot nail art!

Happy Nail Art-ing!
Sam x

Geometric Mermaid Nail Art Tutorial

I decided to give mermaid nail art a bit of a gothic twist and created this geometric look. Keep reading to find out how I created this look...

Geometric Mermaid Nail Art Tutorial

What will you need?

To create this look you will need a purple and black polish, a teal glitter polish, some striping tape, a few nail art gems and a dotting tool.
The polishes I used were Colour Club 'Midnight Mulberry', Avon Stardust in 'Teal Glitter' and Essie 'Liquorice'.


Step-By-Step Tutorial:


Step 1: Begin by painting all nails in two coats of purple polish.

Step 2: Taking some striping tape and add two stripes in a triangle design.

Step 3: Take the teal glitter onto a dotting tool and fill in the large triangle. Then take the black polish onto a dotting tool and fill in the gap between the two pieces of striping tape.

Step 4: Add a layer of top coat to each nail and press a gem at the tip of the black polish.

And there you have your geometric mermaid nail art.


Happy Nail Art-ing!
Sam x

Saturday, 25 June 2016

Strawberry Nail Art Tutorial

Strawberry nail art designs are perfect for the summer months, so now the sun is starting to break through the clouds, I thought I would embrace this summer strawberry nail art.

Strawberry Nail Art

What will you need?

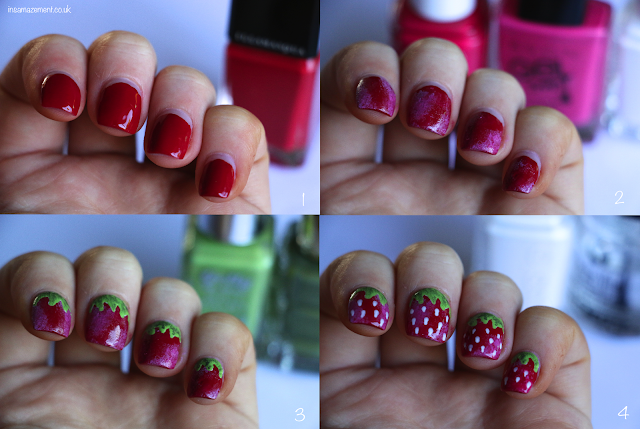
You will need a white, red, pink, dark & light green polish, a dotting tool, a makeup sponge and a top coat.
The polishes I used were Essie 'Blanc' (white) Illamasqua 'Throb' (red), Avon Gel Finish polish in Parfait Pink (pink), Barry M 'Key Lime' (light green) and L'Oreal Paris Colour Riche L'Huile in 'Vert Absynthe' (dark green).

Step-By-Step Tutorial:

Strawberry Nail Art Tutorial

Step 1: Begin by painting all nails in the red polish. You don't need to take this the whole way to the cutie, so just go about 3/4 of the way up the nail.

Step 2: Next, taking the lighter pink shade onto a makeup sponge, press randomly over the nail to create some texture.

Step 3: To begin the strawberry leaves I took the white polish to create the outline, this helps the green appear more vibrant instead of applying over the red polish. I then went over the white with the light green polish. Once dry I took the darker green onto a sponge to create some texture again.

Step 4: Finally take the white polish onto a dotting tool to create the strawberry seeds. Once everything is dry, add a layer of top coat to each nail.


... and there you have your strawberry nail art


Have you ever created a fruity nail art?

Happy nail art-ing! 
Sam x

Sunday, 12 June 2016

Watercolour Nail Art Tutorial

I was having a scroll through pinterest and came across many watercolour nail art looks which inspired me to created my very own with a gem/3D twist. 

Watercolour Nail Art Tutorial

What will you need?

To create this look all you will need is a white polish, I used Essie 'Blanc'; some sheer nail varnishes, I used the OPI 'Sheer Tints', however you could also mix acetone with a regular polish; some nail art gems, mine were from the Avon 'Nail Gem Assortment Wheel' and finally a dotting tool to help you pick up the gems with ease.

Step-By-Step Tutorial:

Step 1: Take a white polish and paint this onto the base of each nail. Leave this to dry completely before moving on.

Step 2: Next taking your sheer polishes, add randomly over the nail to create a watercolour pattern.

Step 3: Finally seal everything into place with a top coat and press the nail gems onto each nail in a design of your choice. You may want to go back in with a top coat after to make sure the gems don't budge.

And there you have your watercolour nail art?

Watercolour Nail Art Tutorial

What nail art looks will you be rocking this summer?

Happy Nail Art-ing! 
Sam x

Marble & Shattered Glass Nail Art Tutorial

Both marble and shattered glass nail art techniques are all over Instagram at the moment, so I thought I would combine the two to create the look below. Keep reading to find out how...

Marble & Shattered Glass Nail Art Tutorial

What will you need?

To create this look you will need light pink, dark pink and black polishes, a glitter/shattered glass top coat, some cling film, a makeup setting spray, a large-ish bowl full of water and some cotton buds.

The polishes I used were Essie 'Lovie Dovie' (light pink), 'Big Spender' (dark pink) & 'Liquorice' (black), along with Avon 'Magic Effects Diamond Shatter'. I also used the NYX 'Matte Finish Setting Spray' for the marble technique.


Step-By-Step Tutorial:

Water Marble Nail Art Tutorial

Step 1: Begin by painting all nails in two coats of a Barbie pink polish.

Step 2: Next take some cling film, wrap it into a ball, lightly paint a darker pink shade onto one side and press this over the nail.

Step 3: Now for the water marble technique. Add two drops of black polish into a bowl of water and spray over the top with a spray (such as a makeup setting spray) to disperse the polish and create a marble effect (shown in the image below). Drop your nail over the polish and down into the water and then take a cotton bud to clean up the excess around your finger and in the water.

Step 4: Take a glitter/shattered glass top coat and paint over each nail. Finish off each nail with a layer of top coat to seal everything in.


And there you have your marble nail art topped with a shattered glass effect!


Have you ever created a marble nail art using water?

Happy Nail Arting!
Sam x

Sunday, 22 May 2016

Mermaid Holographic 3D Nail Art

Today I jumped onto the 3D nail art trend and created this holographic/mermaid inspired design. The gems might be too much for some, but why not skip this step out and just create the holographic base for a more everyday, wearable look. Keep reading to find out how I created this nail art look...

Mermaid Holographic 3D Nail Art

What will you need?

A pink and blue polish, a holographic top coat, a clear top coat and some nail art gems.
The polishes I used were Essie 'Lovie Dovie' (pink), Illamasqua 'Caress' (blue) and Models Own 'Indian Ocean' (holographic top coat). The gems I used were from the 'Avon Nail Gem Assortment Wheel'.

Step-By-Step Tutorial

Step 1: Begin by sponging the pink and blue polishes onto each nail. I created an ombre effect on the thumb, middle and ring finger, added just the blue polish on the little finger and on the index finger I added a coat of the pink polish.

Step 2: Take the holographic top coat and add this onto each nail. I added two coats to make the effect stronger.

Step 3: Taking different sized nail gems place them onto the nails whilst the top coat is drying.

Step 4: Take a clear top coat and paint a layer onto each nail to seal everything into place.

And there you have your holographic/mermaid nail art with a 3D twist.

What are your favourite nail art trends at the moment?

Happy Nail Arting! Sam x

Sunday, 27 March 2016

Easter Chick & Spring Flower Nail Art Tutorial

Happy Easter everyone! To celebrate the Easter weekend I have created this Easter chick and spring flower nail art.

Easter Chick & Spring Flower Nail Art Tutorial

What will you need?
To create this look you will need polishes in white, pastel green, pastel blue, pastel pink, yellow, orange, green, purple, pink and black. You will also need a dotting tool to help create the smaller designs.
The polishes I used were L'Oreal Paris Colour Riche L'Huile in Blanc De Lune (white), Dimanche Apres-Moi (pastel pink), Violet Vendome (purple) and Nymph (pink); Avon Sprightly Mint (pastel green), Rain Washed (pastel blue), Lemon Sugar (yellow), Orange Crush (orange), Emerald City (green) and Matte Black (black).

Step-By-Step Tutorial

Easter Chick & Spring Flower Nail Art Tutorial

Step 1: Begin by taking the pastel shades and painting each nail a different shade. Keep the ring finger nail yellow for the chick.
Step 2: Next taking various shades onto a dotting tool, create the flower petals and add a dot to the centre of each flower.
Step 3: Using the orange polish create two feet and a beak towards the bottom half of the nail. Then taking the black and white polishes create two eyes.
Step 4: Once everything is dry, add a topcoat to each nail to seal everything into place.

And there you have your easter chick and spring flower nail art!

Easter Nail Art

What are you up to for easter? Do you have any easter nail art plans?

Sam x