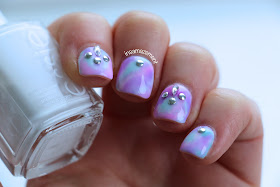
I was having a scroll through pinterest and came across many watercolour nail art looks which inspired me to created my very own with a gem/3D twist.
What will you need?
To create this look all you will need is a white polish, I used Essie 'Blanc'; some sheer nail varnishes, I used the OPI 'Sheer Tints', however you could also mix acetone with a regular polish; some nail art gems, mine were from the Avon 'Nail Gem Assortment Wheel' and finally a dotting tool to help you pick up the gems with ease.
Step-By-Step Tutorial:
Step 1: Take a white polish and paint this onto the base of each nail. Leave this to dry completely before moving on.
Step 2: Next taking your sheer polishes, add randomly over the nail to create a watercolour pattern.
Step 3: Finally seal everything into place with a top coat and press the nail gems onto each nail in a design of your choice. You may want to go back in with a top coat after to make sure the gems don't budge.
And there you have your watercolour nail art?
What nail art looks will you be rocking this summer?
Happy Nail Art-ing!
Sam x


No comments:
Post a Comment