Pages

Saturday, 25 June 2016

Strawberry Nail Art Tutorial

Strawberry nail art designs are perfect for the summer months, so now the sun is starting to break through the clouds, I thought I would embrace this summer strawberry nail art.

Strawberry Nail Art

What will you need?

You will need a white, red, pink, dark & light green polish, a dotting tool, a makeup sponge and a top coat.
The polishes I used were Essie 'Blanc' (white) Illamasqua 'Throb' (red), Avon Gel Finish polish in Parfait Pink (pink), Barry M 'Key Lime' (light green) and L'Oreal Paris Colour Riche L'Huile in 'Vert Absynthe' (dark green).

Step-By-Step Tutorial:

Strawberry Nail Art Tutorial

Step 1: Begin by painting all nails in the red polish. You don't need to take this the whole way to the cutie, so just go about 3/4 of the way up the nail.

Step 2: Next, taking the lighter pink shade onto a makeup sponge, press randomly over the nail to create some texture.

Step 3: To begin the strawberry leaves I took the white polish to create the outline, this helps the green appear more vibrant instead of applying over the red polish. I then went over the white with the light green polish. Once dry I took the darker green onto a sponge to create some texture again.

Step 4: Finally take the white polish onto a dotting tool to create the strawberry seeds. Once everything is dry, add a layer of top coat to each nail.


... and there you have your strawberry nail art


Have you ever created a fruity nail art?

Happy nail art-ing! 
Sam x

Sunday, 12 June 2016

Watercolour Nail Art Tutorial

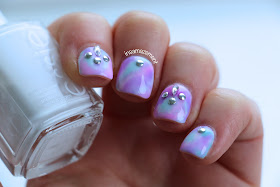
I was having a scroll through pinterest and came across many watercolour nail art looks which inspired me to created my very own with a gem/3D twist. 

Watercolour Nail Art Tutorial

What will you need?

To create this look all you will need is a white polish, I used Essie 'Blanc'; some sheer nail varnishes, I used the OPI 'Sheer Tints', however you could also mix acetone with a regular polish; some nail art gems, mine were from the Avon 'Nail Gem Assortment Wheel' and finally a dotting tool to help you pick up the gems with ease.

Step-By-Step Tutorial:

Step 1: Take a white polish and paint this onto the base of each nail. Leave this to dry completely before moving on.

Step 2: Next taking your sheer polishes, add randomly over the nail to create a watercolour pattern.

Step 3: Finally seal everything into place with a top coat and press the nail gems onto each nail in a design of your choice. You may want to go back in with a top coat after to make sure the gems don't budge.

And there you have your watercolour nail art?

Watercolour Nail Art Tutorial

What nail art looks will you be rocking this summer?

Happy Nail Art-ing! 
Sam x

Marble & Shattered Glass Nail Art Tutorial

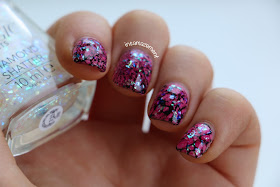
Both marble and shattered glass nail art techniques are all over Instagram at the moment, so I thought I would combine the two to create the look below. Keep reading to find out how...

Marble & Shattered Glass Nail Art Tutorial

What will you need?

To create this look you will need light pink, dark pink and black polishes, a glitter/shattered glass top coat, some cling film, a makeup setting spray, a large-ish bowl full of water and some cotton buds.

The polishes I used were Essie 'Lovie Dovie' (light pink), 'Big Spender' (dark pink) & 'Liquorice' (black), along with Avon 'Magic Effects Diamond Shatter'. I also used the NYX 'Matte Finish Setting Spray' for the marble technique.


Step-By-Step Tutorial:

Water Marble Nail Art Tutorial

Step 1: Begin by painting all nails in two coats of a Barbie pink polish.

Step 2: Next take some cling film, wrap it into a ball, lightly paint a darker pink shade onto one side and press this over the nail.

Step 3: Now for the water marble technique. Add two drops of black polish into a bowl of water and spray over the top with a spray (such as a makeup setting spray) to disperse the polish and create a marble effect (shown in the image below). Drop your nail over the polish and down into the water and then take a cotton bud to clean up the excess around your finger and in the water.

Step 4: Take a glitter/shattered glass top coat and paint over each nail. Finish off each nail with a layer of top coat to seal everything in.


And there you have your marble nail art topped with a shattered glass effect!


Have you ever created a marble nail art using water?

Happy Nail Arting!
Sam x