Im back with another geometric nail art and today I went for bright summer colours with a hint of 90s iridescent/holographic polish. If you want to find out how I created this look keep reading...
What will you need?
All you will need it a pink, peach, pale blue and holographic polish, some nail art striping tape, a dotting tool and a top coat.
The shades I used were Illamasqua 'Purity', Models Own 'Blueberry Muffin' and Colour Club 'Cloud Nine'.
Step By Step Tutorial:
Step 1: Begin by painting all nails in a pink base and leave this to dry completely.
Step 2: Create the geometric designs by taking the striping tape and placing pieces over the nail in stripe designs.
Step 3: Taking each polish in turn, add these as you wish into the striping tape gaps.
Step 4: Peel off the tape and once everything is dry add a top coat to each nail.
And there you have your summer geometric nail art!
Do you have any nail art designs planned for the summer? Let me know in the comments below.
Happy Nail Arting! Sam x
Sunday, 28 June 2015
Saturday, 27 June 2015
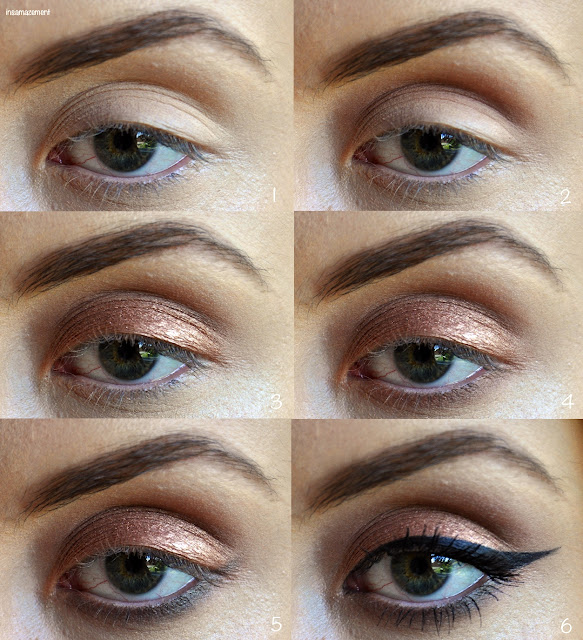
Bronze and Khaki Eye Makeup Tutorial
Its been a while since I did a step-by-step eye makeup tutorial and they're one of my favourite posts to create. Recently I have been jumping on the rust and khaki fashion trends and creating an eye makeup look to match, adding bronze shades to my lids and smudging a subtle khaki shadow beneath the lower lash line.
Step-By-Step Tutorial:
Step 1: To begin I placed a neutral shadow all over the lid and filled in my brows.
Step 2: Taking a warm brown shadow onto a fluffy brush I blended this through my crease.
Step 3: Taking a shimmer bronze shadow, I pressed this all over the lid, adding several layers to intensify the colour.
Step 4: Next I added the warm brown shade under my lower lash line.
Step 5: Taking a dark green/khaki shadow onto a small detailing brush I blended this under the eye.
Step 6: To finish off and frame the eye I added a winged liner and some mascara.
All the products I used to create the full face look are listed below...
Face:
Illamasqua SkinBase Foundation
Collection Lasting Perfection Concealer in 01 'Fair' to highlight
House of GlamDolls GlamBase Wheel (to contour)
Illamasqua Sculpting Duo (to intensify the contour)
Nars 'Laguna' Bronzer to warm up the skin
Illamasqua Powder Blusher in 'Ambition'
Phees Makeup Tips 'The Original' Highlighter
Eyes:
Illamasqua Eyebrow Cake in 'Peek' and 'Motto'
Makeup Revolution Flawless Eyeshadow Palette
Maybelline Gel Liner
L'Oreal Paris Miss Manga Mascara
Lips:
Illamasqua Lip Liner in Fantasy
Illamasqua Lipstick in Fable
I hope you like my makeup look? What looks have you been loving recently?
Sam x
Saturday, 20 June 2015
Geometric Nail Art Inspired by Dahlia Nails
Emma & Jo from Dahlia Nails have an amazing nail art blog and their Instagram account is one of my favourites. I was recently have a browse through their page to get some nail art inspiration and I came across these amazingly bright geometric nails which I just had to recreate myself. The bright colours are perfect for summer, so if you want to find out how I created this look keep reading...
What will you need?
Nail polish in white, bright pink, blue and green, a top coat and a small nail art dotting tool.
The shades I used are Models Own 'Coconut Cream' (white) and 'Sun Hat' (bright pink), Illamasqua 'Cameo' (blue) and Collection 'Look at Me!' (green).
Step-By-Step:
Step 1: Begin by painting all nails in a base of the white polish and leave this to dry completely
Step 2: Take the pink, blue and green polishes in turn onto a dotting tool and create small triangles in vertical lines on each nail.
Step 3: Wait until everything is dry and then finally add a top coat to each nail.
And there you have your fun and bright geometric nail art!
I hope you like this design! If you haven't already be sure to go and check out more of Emma and Jo's nail art designs at Dahlia Nails.
Happy Nail Arting! Sam x
Tuesday, 16 June 2015
The Power Of Makeup
As some of you may have seen, the other day Nikki Tutorials posted a video titled "The Power of MAKEUP", where she showed a transformational makeup look by applying products to just one side of her face. To me makeup is all about giving me more confidence as well as having fun creating new looks and trying out new products. Nikki's video really inspired me to do the same so here is my, more subtle take, on a half face of makeup to show just what power makeup really has and why I love it!
The products I used were:
Skin:
Illamasqua Skinbase Foundation in '04', Collection Lasting Perfection Concealer in 01 'Fair', House of GlamDolls 'GlamBase Wheel', Illamasqua 'Sculpting Duo' and 'Katie' Blush, Nars 'Laguna' Bronzer and No7 Shimmer Brick.
Eyes:
Crown Brush '28 Nude Eyeshadow Palette', Maybelline Gel Liner, L'Oreal Paris 'Miss Manga' Mascara and Illamasqua 'Eyebrow Cake in Motto and Peek'
Lips:
Rimmel Lasting Finish Lip Pencil in 'Spice' and L'Oreal Paris Colour Riche Lipstick in '630 Beige Á Nu'
If you have created a half face look I would love to see so leave a link to your video/blog post in the comments below.
Sam x
Subscribe to:
Posts (Atom)


