Pages

Tuesday, 30 December 2014

New Years Eve Nail Art

You may have seen my New Years Eve makeup post yesterday, so today is the turn of nails and I have created a super sparkly nail art design, perfect to say goodbye to 2014 and hello to 2015. 

New Years Eve Nail Art

New Years Eve Glitter Nail Art Tutorial


To create this design I used Barry M 'Magnetic - Violet', Illamasqua 'Viridian', Colour Club Gold Glitter and Mavala 'Pure Diamond'


1. I began by painting my nails in the jade and deep violet shades and leaving this to dry completely.

2. Next taking some striping tape, I placed strips evenly over each nail to create the design. 

3. Taking the gold and silver glitter polishes onto a dotting tool, I carefully filled in the gaps between the tape. I left this to dry and then removed the tape. 

4. Finally once everything is completely dry, take a top coat and apply this to each nail to seal in the design and even out the nails.

And there you have your super sparkly NYE nail art design!


What do you think of this look? I hope you have a fab new years eve and Happy 2015!

Sam x

Monday, 29 December 2014

New Years Eve Makeup

With New Years Eve coming up later this week, I thought I would show you a makeup look I have been loving at the moment. The smokey berry and gold eye, paired with a red lip are the perfect combination to see in the new year. 


Eyes:

To define my brows I used Illamasqua Brow Cake in Peek. Using the Naked 3 Palette, I took the shade 'Liar' and pressed this onto the outer and inner corners of my eye, as well as under the lash line and blended this out using a fluffy brush. Next I took Illamasqua pure pigment in 'Furore' and pressed this into the centre of my lid. To create a strong flick of liner I used Maybelline Gel Liner and finished off the look with a few coats of Maybelline Falsies Mascara. This look would also look stunning with a pair of lashes to add a bit more drama to the eyes.

Lips:

On my lips I began by lining my lips with Illamasqua lip liner in 'Feisty' and added a darker shade into the corner of my lips using Illamasqua lip liner in 'Severity'. Finally I took Illamasqua lipstick in 'Isis' all over the lips. 

Skin:

I started by applying Illamasqua SkinBase Foundation on my skin and lightened my under eye area using Collection Lasting Perfection Concealer in 'Fair'. To contour I used Nars Laguna Bronzer and added a pop of pink to my cheeks using Illamasqua Powder Blusher in Nymph. Finally to highlight I used Illamasqua Gleam in Aurora and topped this with the Seventeen Shimmer Brick. 


What are your new years eve plans? I hope you all have a great evening seeing in 2015!

Sam x

Friday, 26 December 2014

Snowflake Christmas Nail Art

Snowflake Christmas Nail Art


Happy Christmas Everyone!

In true festive spirit I have created another Christmas nail art and today its the turn of snowflakes. I am sure you have seen lots of snowflake nail art flying around blogs and on instagram, so I thought I would mix things up by using slightly different colours to your conventional snowflake design. 

To begin I painted my nails in two coats of Avon Gel Finish Polish in 'Wine and Dine Me'. Next, taking Avon Gel Finish Polish in 'Lavender Sky' onto a fine nail art brush I created the snowflakes on each nail. Finally, onto a dotting tool, I placed a white nail varnish and created polka dots surrounding the snowflakes. I finished off the look with a top coat to seal in the design and prevent chipping.

And there you have a snowflake nail art design. 

I think its time for me to start thinking of some new years eve designs. Lots of sparkle and glitter I'm thinking! Let me know in the comments if you have any ideas. I hope you have a lovely Christmas Day!

Sam xx


Friday, 19 December 2014

My Birthday Makeup

So it was my 22nd Birthday on Wednesday and so I thought I would share with you my birthday makeup look. I went our for dinner in the evening with my family, so I wanted to keep the lip quite neutral to avoid ending up with either lipstick all over my face or a lipstick rim around my lips in a nice restaurant (not pretty!), however I paired this with quite a strong winged out eye.


Urban Decay Naked 3 Palette

Eyes:
I hadn't used my Urban Decay Naked 3 palette for a while, so I thought I would rekindle my love for it on my birthday. The rose gold and warm tones were perfect for the look I was going for. I began by blending 'Nooner' all over the lid and under the lower lash line. I then pressed 'Trick' into the centre of the lid, just to add a bit of sparkle and finally I took 'Blackheart' through the crease and slightly under the lower lash line just to create some definition. I finished off the eyes with a strong winged liner using Maybeline Gel Liner (my fav!) and lashings of mascara - Maybelline 'The Falsies'. I also defined my brows using Illamasqua Eye Brow Cake in Peek. 

Face:
On my skin I used Illamasqua SkinBase Foundation and Collection Lasting Perfection Concealer. I wanted a bronzed glow to my skin, so I used my Nars Laguna bronzer to contour and added Illamasqua Gleam to the tops of my cheekbones as a highlight. I went for a girly pink blush using Illamasqua Powder Blusher in 'Nymph'. 

Lips:
Finally for the lips I used Nyx lip pencil in 'Mauve' and added a small amount of Kiko 'Pink Carnation' over the top. 


I hope you enjoyed this post! What are your favourite makeup products to use at the moment?

Sam x


Monday, 15 December 2014

Christmas Elf Nail Art Tutorial

Sorry it's been a while since I last posted, I had a busy last week at Uni but I'm back home for Christmas now, so hopefully I will be posting more often. I am back with another nail art and today its time to bring out the Christmas Elf's! If you want to find out how I created this look keep reading...

Christmas Elf Nail Art

Christmas Elf Nail Art

All you will need for this look is nail varnish in the shades red, green, nude, white and black. It would also be handy to have a dotting tool and a top coat.

Step-By-Step Tutorial:

Christmas Elf Nail Art Tutorial

Step 1: Begin by painting a glitter base on your nails. This will mostly be covered, however I thought it would be nice to add some christmas glitter to any areas which can be seen.

Step 2: Once the base is dry, take the nude shade and apply this to just the tip of each nail.

Step 3: Next taking the red and green polishes onto a dotting tool, crease the outline of the hat towards the top of the nail. I alternated the colours on each nail just to mix it up slightly.

Step 4: Taking the black polish onto a dotting tool, carefully outline the hat to create some definition.

Step 5: Taking the white and black polish, again on a dotting tool, add some googley eyes.

Step 6: Once everything is dry, finish off the look by adding a top coat. 

And there you have your cartoon elf nail art!

Christmas Nail Art

Christmas Nail Art

What do you think of this nail art look? What have you guys been doing to get yourselves in the Christmas Spirit?

Happy Nail-Arting!
Sam x


Tuesday, 2 December 2014

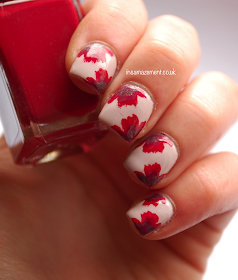
Red Christmas Flower Nail Art

How is it December already!? This year has flown by! With just 21 days until Christmas, I thought it was about time I started on the Christmas nail art looks. My first nail art was inspired by a Poinsettia Flower, which really remind me of Christmas time.

Red Christmas Flower Nail Art


To create this look all you will need is nail varnish in the shades: nude, red, maroon and dark gold. It would also be handy to have a small nail art brush to hand.
The shades I used were OPI 'don't bossa nova me around' (nude) and Illamasqua 'Throb' (bright red), 'Facet' (dark gold) and 'Scarab' (maroon).

To begin I painted my nails in the nude shade and left this to dry completely. Then I went in with the bright red shade on a small nail art shade and roughly created three petals on opposite corners of each nail. Then I took the darker maroon varnish, again on the nail art brush, and added this to the centre of each flower. Next I took the dark gold polish and placed this on the very tip/centre of each flower to create some texture. 

And there you have your red Christmas flower nail art!


Red Christmas Flower Nail Art Tutorial

Have you planned any Christmas nail art designs you want to have a go at? I cannot wait to create more and share them with you guys!

Happy Nail-Arting! Sam x


Wednesday, 26 November 2014

YOU Beauty Christmas Advent Calendar 2014

YOU Beauty Christmas Advent Calendar

Who's excited for Christmas? I know I am and my mum surprised me with the 'YOU Beauty' Advent Calendar so now I'm even more excited!

I am sure you have seen lots of beauty advent calendars flying around the blogosphere from the likes of Benefit and Ciaté. However, this one from 'YOU Beauty' is new to the scene and is perfect for us beauty lovers as it features a whole range of our favourite brands; including Essie, Benefit, Laura Mercier, Liz Earl, John Freida and many more.  Each day you open up the door to a new product, ranging from makeup and haircare, to skin care and bath and body products.

I have been very good and left it tucked away so i'm not tempted to have a sneaky peek inside some of the doors, so I am super excited for the 1st of December so I can start to reveal the goodies and try out some new products!

I don't want to spoil it too much by telling you everything that is inside however if you want to find out more take a look here.

Have you got your hands on a beauty advent calendar this year? Which ones do you like the look of?

Sam x

Friday, 21 November 2014

#QuizDressNails Nail Art Competition

Today I'm back with another nail art look especially for the #quizdressnails competition running at the moment! If you don't know about this competition, all you have to do is pick a dress from the Quiz website and create a nail art inspired by that dress. My nail art look was inspired by the 'Blue Tropical Embellished Print Tunic dress' and here they are...

#QuizDressNails Nail Art Competition


I love the different tones,ombré effects and patterns in the dress and I thought they would make a super fun nail art. 


If you want to be in the chance of winning some Quiz vouchers all you have to do is:

  1. Pick a Quiz dress that inspires you
  2. Create your nail art design
  3. Post a picture of your nails and chosen dress on your blog
  4. Follow @beautyuk and @quizclothing on Twitter and tweet your entry using the hashtag #quizdressnails
Competition closes: 30th November so hurry you have just over a week left to enter!

If you enter be sure to let me know in the comments below, I would love to see your design.

Happy Nail Art-ing! Sam x


Wednesday, 12 November 2014

Cow Print Nail Art Tutorial

I was looking for some nail inspiration the other day, when I stumbled on a very talented nail artist known on Instagram as Sruiq. She did some super cute cow print nails which I just had to have a go at myself and here is the final look...

Cow Print Nail Art Tutorial

Cow Print Nail Art

I began by painting all my nails in a white base, apart from my ring finger which I painted in a nude shade. Next taking a black polish onto a dotting tool I created the cow print and the outline of the cows face. Going in with a light pink shade, I created the cows nose and using the white polish again, I created the ears and face of the cow. Finally I went back in with the black and white polishes to create the cows eyes and once everything was dry polished my nails off with a top coat. 

The nail varnishes I used were Illamasqua 'Boosh' & 'Scorch'; Nails Inc 'Porchester Square' and No17 'Pink Lemonade'.

Cow Nail Art

And there you have your cow nail art! What do you think of this look?

Happy Nail Art-ing!
Sam x

Friday, 7 November 2014

Tanya Burr Cosmetics Lashes: Girls Night Out

As I'm sure most of you know, late last month Tanya Burr added to her cosmetics line by introducing lashes into the mix.

If you know me, you know I am a HUGE fan of lashes so I obviously had to run to Superdrug and pick up a pair! They come in a range of different styles, from super natural day time lashes, individual & corner lashes, as well as volumous evening lashes, all with really cute names. I love a dramatic lash so I went for 'Girls Night Out'.

Tanya Burr Cosmetics Lashes: Girls Night Out

Tanya Burr Lashes

I love that the band on the lashes is super thin, meaning you don't have to worry if you don't want a thick black liner! You can easily get them close to your natural lashes and they're super comfortable. I also found them really easy to apply!

The glue that comes with the lashes is also amazing; if you have ever tried the Illamasqua lashes, the glue is very very similar. It applies almost with a pearlised glow and dries transparent. The small glue wand/applicator makes it easy to apply to the band and dries quickly so you don't have to worry about the lash moving when you have dropped it into the right place.

Tanya Burr Cosmetics Lashes

Im heading out tonight so I thought I would create a makeup look and show you what they look like on. What I love about these lashes is even though they fill out my natural lash line to create definition and volume, they don't look too heavy and they definitely don't weigh my eyes down! 

Tanya Burr Cosmetics Lashes

Tanya Burr Cosmetics Lashes: Girls Night Out

Overall I really love the Tanya Burr lashes that I picked up and I will definitely be trying more styles - the 'Date Night' style is the next on my list!! All the styles are priced at £5.99 and I believe you can pick them up from either Superdrug or FeelUnique.

Have you tried these lashes yet or any of the other Tanya Burr Cosmetics products? What are you favourites?

Sam x

Friday, 31 October 2014

Googly Eye Halloween Nail Art Tutorial

HAPPY HALLOWEEN!!

I am SOO excited for Halloween this year! After celebrating at the #AsDarknessFalls Halloween party last week I am in the spooky spirit to do it all over again tonight! Today I created a googly eye nail art inspired by a look I saw over on the WAH nails Instagram page.

Googly Eye Halloween Nail Art Tutorial

Googly Eye Halloween Nail Art

Unfortunately I didn't have the right lighting to take step-by-step photos when I did the nail art last night (definitely something I'm adding to my xmas list!). However this look was really easy to create...

Step 1: Begin by painting all nails in black and leave to dry.

Step 2: Next taking the white polish onto a large dotting tool, create different sized circles over the nail, to act as the base of each eye.

Step 3: Next taking your different colours in turn, add smaller dots inside the larger white dots.

Step 4: Taking your black and white polishes onto a small dotting tool, create a further two dots inside the coloured circles.

Step 5: After you have left everything to dry completely, add a top coat to each nail to seal everything into place.

And there you have your googly eye nail art!

Googly Eye Halloween Nail Art

Googly Eye Halloween Nail Art


I hope you all have an amazing Halloween tonight! Let me know in the comments below what you're doing to celebrate!

Sam x

Pumpkin Halloween Nail Art Tutorial

Im back with another Halloween nail art and today is the turn of the ever famous Halloween Pumpkin! I LOVE pumpkin carving, however uni has taken over a bit this year and I haven't had time to whip up a pumpkin creation. I guess painting a pumpkin nail art is nearly as good! If you want to find out how I created this look keep reading...

Pumpkin Halloween Nail Art Tutorial

Pumpkin Halloween Nail Art

All you will need for this look is nail varnish in the shades: orange, yellow, black and gold glitter. It will also be handy if you have a dotting tool and sponge to hand.
I used Illamasqua's 'Boosh' (black) and 'Gamma' (orange); Graffiti Nails 'Mellow' (yellow) and Barry M 'Yellow Topaz Glitter' (golden glitter).

Step-By-Step Tutorial:

Pumpkin Halloween Nail Art Tutorial

Step 1: To begin paint all nails in a base of orange and leave to dry.

Step 2: Next taking the yellow nail varnish onto a small sponge, create a mottled effect over the nail.

Step 3: Taking your black polish onto a dotting tool create the pumpkin faces.

Step 4: Next, taking the yellow shade on the sponge carefully apply this on top of the black detailing to create some texture.

Step 5: Now its time to top the pumpkin faces with the glitter. I did this using a dotting tool.

Step 6: Finally, once everything is completely dry apply a top coat to each nail.

And there you have your pumpkin nail art!!


What do you think of this nail art look? What are you guys up to this Halloween?

Happy Nail-Arting!
Sam x

Friday, 24 October 2014

Sugar Skull Halloween Nail Art Tutorial

The other day I was lucky enough to be invited along to the Daily Mix #AsDarknessFalls Halloween Party. Along with my makeup being a half sugar skull look, I also did a sugar skull nail art and thought I would share it with you!

Sugar Skull Halloween Nail Art

Sugar Skull Halloween Nail Art

Along with some nail art dotting tools and fine brushes, you will also need nail varnish in black, white, pink and a glitter polish. Also to add even more sparkle to the nail art look you will need some small gems. 
The shades I used for this look were Illamasqua 'Boosh', 'Scorch' and 'Obsess' and L.A. Colour 'Jewel Tone'. 

Step-By-Step Tutorial:

Sugar Skull Halloween Nail Art Tutorial

Step 1: Begin by painting all nails in a base of white polish.

Step 2: Next taking the black polish onto a large dotting tool, create two eyes on each nail.

Step 3: Next taking a smaller dotting tool and the pink polish, add tiny dots around the edge of each large dot.

Step 4: Then taking your black polish onto a small dotting tool create two adjacent dots for the nose. Next take the black polish again and create a series of black dots in a line. Once dry take your white polish and add a smaller dot to the centre of the black to create the mouth.

Step 5: Taking the black polish add three small lines above the eyes. Also taking the pink and black polish create some small dots to add detailing on the cheek area. By placing a small dot of top coat just above the centre of the eyes, take a small gem and press this on top.

Step 6: Finally once everything is dry, take a top coat and add a layer to each nail.

And there you have your sugar skull nail art!

Sugar Skull Halloween Nail Art

Sugar Skull Halloween Nail Art

What do you think of this nail art? Have you created any looks for halloween this year?

Happy Halloween and Happy Nail Art-ing!
Sam xx