Pages

Tuesday, 29 July 2014

Neon Tie Dye Nail Art Tutorial

So I couldn't help but use my new Models Own Polish for tans collection in the next nail art I did and this funky tie dye design is what I came up with! As always I have put together a pictorial as well as what you may need to create a similar look yourself so keep reading...

Neon Tie Dye Nail Art Tutorial

What will you need?
A selection of neon nail varnishes, as I mentioned I used three shades from the Models Own 'Polish For Tans' collection. You will also need a white nail varnish, I used Models Own 'Coconut Cream'. Amongst all the colourful goodness you will need a top coat, some tape and a cut up sponge.


Step-By-Step Tutorial:

Neon Tie Dye Nail Art Tutorial

Step 1: Begin by applying the white nail varnish to the base of each nail. After you have left this to dry COMPLETELY you can add the tape to each nail. I cut the tape to make small triangles.

Step 2: Take one of your neon shades onto a sponge and press this randomly over the nails. Repeat this for step 3 and 4, filling in all the gaps.

Step 5: Peel off the tape to reveal your design. 

Step 6: Finally add a layer of top coat to each nail. This will even out the nail and add a shine finish!

And there you have your Neon Tie Dye nail art!

Neon Tie Dye Nail Art Tutorial

Neon Tie Dye Nail Art Tutorial

What do you think of this nail art design? Will you be throwing on the neon shades this summer?

Happy Nail Art-ing! Sam x


Tuesday, 22 July 2014

OCC Lip Tar 'Lydia' Review

I have been wanting to try a Lip Tar from Obsessive Compulsive Cosmetics for a long long time! When I was at IMATS last month I finally got to browse all the shades and picked out 'Lydia' as my colour of choice.

OCC Lip Tar 'Lydia' Review

'Lydia' is a deep raspberry shade. You only need a tiny tiny amount to cover the lips in colour and the formula is quite runny. As you can see on the packaging, it says the lip tar has a matte finish. Im not sure if I'm doing something wrong as it never seems to dry completely matte onto my lips, no matter how long I leave it. Saying this I actually quite like the slight glossy finish, as it leaves the lips feeling moisturised.


As I mentioned, the formula of the lip tar is quite runny. Therefore, I found it best to squeeze a small amount onto my lips and spread it out with a lip brush. The runny formula also makes it quite hard to make a precise edge on the lip and therefore before applying, I went around my lips using the NYX colouring lip pencil in 'Mauve'.  The packaging makes it super easy to apply the product directly onto the lips and a tiny squeeze is all that is needed as more than this will leave a flood of lip tar on the lips.

The lasting power of the lip tar is impressive. I didn't have to touch it up until I had a bite to eat, as with most lip products. It leaves almost a slight stain on the lips, however nothing a cleanser or face wipe can't remove.

OCC Lip Tar 'Lydia' Review

I love the shade and think its perfect paired with a simple eye for the daytime or a golden smokey eye for the evening. I created the look below with my MAC eye shadows in 'All That Glitters' and 'Woodwinked', finishing off the eyes with a flick of liner.

OCC Lip Tar 'Lydia' Review

What do you think of the shade? Have you tried any OCC Lip Tars before?

Sam x

Saturday, 19 July 2014

Models Own Fruit Pastels Swatches and Review

Today I'm back with the remainder of the polishes I picked up in the 6 for £20 Models Own online offer. Amongst the bright neons which you can see swatches of here, I toned it down slightly and added some pastel shades to the mix. I went for the Models Own Fruit Pastels collection and chose three shades that my ever growing nail varnish draw was missing or running low on.

Models Own Fruit Pastels Collection

I went for 'Apple Pie', 'Blueberry Muffin' and 'Coconut Cream'. As you can tell from the lid of the nail varnish bottles, this collection is scented and with coconut being one of my all time favourite smells, this jumped out to me as a must have. I have to say the scents are no way near as strong as I thought, which to be honest I'm quite glad about. I find strong scented polishes tend to give me a headache after a while, however these have a very subtle scent of coconut, apple and blueberry which almost reminds me of the scented gel pens I used to use when I was younger!

The formula of the polishes is perfect - not to thick and not to runny, making them a dream to apply evenly to the nail. I used two coats to achieve an opaque finish and applied a top coat just to even out the nail a tiny bit more and add more shine. The varnishes dry really quickly, meaning you don't have to sit there for ages blowing your nails dry before you can move.

So onto the swatches...

Blueberry Muffin is a baby blue shade with a tiny hint of lilac which doesn't really show up in the photo.


Models Own Fruit Pastels Collection


Apple Pie is a pale mint green.


Models Own Fruit Pastels Collection


Finally my favourite of the three is Coconut Cream, a slightly off white shade.


Models Own Fruit Pastels Collection


These polishes definitely make a great addition to my nail varnish collection and I can't wait to combine them into a nail art look soon! You can grab these online for just £5 each and they also have gorgeous lilac, grape, strawberry and banana pastel shades.

What are your favourite pastel shades? 

Sam xx

Wednesday, 16 July 2014

Models Own Polish For Tans Swatches and Review

So Models Own were offering 6 polishes for £20 online last week and I could help but pick up a few of their fairly new releases to try out. In my bundle of joy I picked up 3 of the 'Polish For Tans' shades. I have been dying to try these out after seeing them on many of my favourite nail blogs, so when I saw the amazing offer online I couldn't resist but add these to my basket.

Models Own Polish For Tans Collection

I picked up the shades 'Beach Bag', 'Sun Hat' and 'Shades. All three polishes are super bright, making them perfect for enhancing your tan this summer. The formula of the polishes is quite thick, meaning they can apply quite streaky onto the nail, however fear not, if you begin by applying a thin coat of the polish and then a slightly thicker coat on top this will reduce the chance of the fearful streaks. They apply to a semi-matte formula so in the swatches below I decided to apply a top coat to each nail, as I love a super glossy look. I was really impressed by the drying time of the polishes too, making them perfect to splash onto the nail if you are just about to rush out the door.

So onto the swatches...

Beach Bag is a bright peachy orange shade.

Models Own Polish For Tans Collection


Sun Hat is a neon pink and definitely my favourite of the three.

Models Own Polish For Tans Collection


Finally Shades is a bright coral pink shade. This shade was quite hard to photograph and is slightly brighter in real life!

Models Own Polish For Tans Collection


Neon shades are definitely my most reached for polishes in the summer so these make a great addition to my collection! If you want to get your hands on these you can pick them up online and also from one of the amazing Models Own Bottleshops, which seem to be popping up all over the place recently, for just £5! There are also a further 2 shades which make up the collection, a bright green and yellow, which I may just have to add to my collection very soon!

What do you think of these super bright summer shades? Are you also a lover of neon in the summer season?

Sam x

Sunday, 13 July 2014

iMats Haul 2: Crown Brush

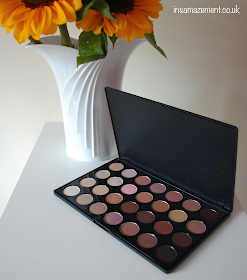
If you saw my last IMATS haul all about what I got from Nyx Cosmetics you will know I am doing a series of posts about what I got at IMATS London from lots of brands. Today is the turn of Crown Brush. I have heard lots and lots of amazing things about their brushes, however I picked up a palette which contains 28 neutral shades! Keep reading if you want to find out what I think of the palette as well as a look I created using some of the eye shadows...

Crown Brush 28 Neutral Palette

As I mentioned the palette contains 28 eyeshadows and they are all neutral shades (whites,pinks, peaches and browns) making it perfect for creating day to day looks, as well as smoking it up for an evening occaision. 16 of the shadows are matte and 12 shimmer, however the shimmer is nothing too noticeable. The packaging is super thin and lightweight, making it perfect for travelling. The only negative I have to say about the packaging is that the matte finish means it marks quite easily and there is no branding or shade names printed onto the packaging.

The pigmentation of the shadows is great, meaning you only need a small amount of product on your brush. Also there is very little fall down - I only found the darker shades to fall down onto my cheek bones, however this is nothing a little bit of concealer can't hide! As for how long the shades last, I have worn a variety of the shadows all day and they didn't move or crease one bit. I was super impressed with the staying power of the palette, making it super easy to wear every day for work or uni!

Crown Brush 28 Neutral Palette

Crown Brush 28 Neutral Palette

Now you all know I love a step-by-step tutorial, so I created this neutral smokey eye using the palette and put together this pictorial:

Crown Brush 28 Neutral Palette


Unfortunately because the shades don't have names it makes it hard to describe how I created this look, however I have labeled the palette with what I used for each part of the eye which I hope helps a bit (see below)! I intensified the smoke in the outer corner of the eye and in the crease, sticking to a lighter shade on the lid. I also added a flick of winged liner using my favourite Maybelline Gel Liner and coated my lashes in Illamasqua 'Masquara'.

Crown Brush 28 Neutral Palette

And here is the final look ... What do you think? You can pick up this palette for £20.99 online here.
If you want to find out what I have on my lips, be sure to follow my blog on Bloglovin as I have a post on this secret lip product coming very soon in a future IMATS haul!

Crown Brush 28 Neutral Palette

Thanks so much for reading!
Sam x

Monday, 7 July 2014

iMats Haul 1: Nyx Cosmetics

Earlier this month I went to iMats London and I thought I would do a series of blog posts showing you what I got my hands on from all different brands at the event. After queuing for 2 hours to get onto the Nyx stand (crazy!), I picked up a few bits which took my fancy and this brings me onto my first iMats haul: what I got from Nyx...

Nyx haul


I have never tried anything from Nyx before so I played it safe and went for products which looked like a typical product I would wear on a day to day basis. Therefore I went for the Born To Glow Liquid Illuminator in '01 Sunbeam', The Lipliner Pencils in '831 Mauve' and '856 Sand Pink / Sable Rosé' and finally the Soft Matte Lip Cream in '06 Instanbul'. 

Born To Glow Liquid Illuminator 

I love a strong highlight on my skin and never leave the house without a wash of highlighter / illuminator on the tops of my cheek bones. Therefore I was really keen to try the Born to Glow Liquid Illuminator. This product is perfect for those of you who prefer a liquid highlighter and the champagne tone is perfect for those of us with fair to medium skin tones. Normally I find the liquid formulas quite hard to apply, as they tend to drag my foundation slightly, however taking this product onto my ring finger and gently pressing and patting onto the top of the cheek bone worked a treat and it gives a gorgeous brightening effect on the skin leaving your skin looking healthy and dewy. Personally I prefer more of a shimmer in my highlight, therefore I paired this with my No.17 Shimmer brick and combining the illuminator with a powder highlighter worked wonderfully!

Nyx Born To Glow Liquid Illuminator

Lipliners

You may already know about my love for lip liners. I rarely apply lipstick without a wash of a lip liner to prime the lips and make my lipstick last that little bit longer. Therefore I was really keen to try the Nyx Lipliners. I played it quite safe and went for neutral and pink tones. The liners are super creamy and glide onto the lips like a dream without dragging and pulling. The shades look stunning on their own and I can definitely see myself grabbing these from my make-up draw to wear on their own, without a lipstick on top, in the daytime. As you can see from my swatch images below 'Mauve' is quite a deep neutral shade, almost with a hint of berry and 'Sand Pink / Sable Rosé' is a stunning pink shade. I am super impressed with the liners and will definitely make a purchase of some more shades in the future.

nyx Lipliners

Nyx Lipliners


Soft Matte Lip Cream

Finally, last but definitely not least I picked up the Soft Matte Lip Cream in 'Instanbul'. I have tried a few matte and velvet liquid lipsticks / creams in the past and never got on with them particularly well. I find them quite uncomfortable to wear as they tend to crack on my lips and whenever I take a bite to eat or drink I fear what I will find when I look in the mirror. However, this product really has knocked the other matte liquid lip products I have tried out the water. It applies super evenly to the lip and the doe foot applicator makes it easier to creat a neat edge along the lip line. The product dries to a matte finish however it doesn't dry up your lips and does not leave your lips feeling at all sticky. The staying power is also AMAZING, the colour does not transfer onto anything, almost acting like a slight lip stain and when eating and drinking it really does not budge. I can see myself using this product a lot this summer and the gorgeous neutral pink shade is perfect for day-to-day wear! The only thing I would say is the shade is slightly different than the packaging, as I was expecting more of a peachy shade, so you may want to swatch before you buy. 

Nyx Soft Matte Lip Cream

Nyx Soft Matte Lip Cream

If I had to pick my stand out favourite product from my mini Nyx haul it would definitely have to be the Soft Matte Lip Cream. In the images below I have used the Soft Matte Lip Cream on top of the Lipliner in 'Sand Pink / Sable Rosé' and the Liquid Illuminator. I combined these with simple bronzed eyes, defined brows, a small amount of contouring and a pop of colour on the cheeks to create this super quick summer daytime make-up.

Nyx Soft Matte Lip Cream

Have you tried anything from Nyx? What is your favourite product of theirs? 

Sam x


Thursday, 3 July 2014

Sunset Ombré Aztec Nail Art Tutorial

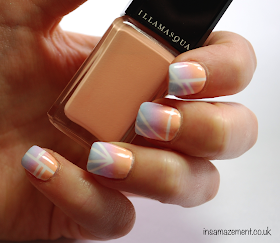
I think you all know by now that I love ombré. Its so easy to do in such little time, I always find myself reaching for a sponge and picking a variety of shades to try out in an ombré design. Today I kept it pastel and added a slight difference to the standard ombre technique by applying striping tape to my nails to create an aztec twist. If you want to find out how I created this look then keep reading ...


All you will need to recreate this look is nail varnish in white, peach, lilac and light blue; some striping tape, a small make-up sponge and a top coat. The nail varnish shades I used were Illamasqua Harem, Purity and Caress

Step-By-Step Tutorial:


Step 1: Begin by painting all nails in two coats of white. This will act as the base for the Aztec design. Leave this to dry completely in order to prevent it pulling up when you apply the striping tape.

Step 2: Apply the striping tape, creating any pattern you wish. I chose to create something different on each nail, however it would also look great with all nails the same!

Step 3: Next taking your three shades onto a small make-up sponge, create the ombre effect and peel off the striping tape.

Step 4: Clean up any nail varnish which may have gone onto the cuticle and around the nail and apply a top coat to each nail. 

And there you have your Ombré Aztec design!


What do you think of this design? What are your favourite shades to create an ombré effect with?

Happy Nail Art-ing!
Sam x