Pages

Sunday, 27 April 2014

Subtle Cut Crease Eye Look

Last weekend I wanted to try and create a subtle cut crease look. I was reasonably happy with the outcome, so I took a few photos and I thought I would share them with you. I used the Urban Decay Naked 3 Palette to create my look as well as eye shadow and blending brushes.


From the Urban Decay Naked 3 Palette, I took Mugshot all over the lid and blended this out using Liar, followed by Looner. I then took Trick under the lower lash line. Finally I applied Darkside and Blackheart through the crease and blended these out to create the subtle cut crease. To frame the eye I lined the top lash line with a flick of gel liner and applied mascara to both the top and bottom lashes. I also applied some individual lashes to the outer corner of my eye to open it slightly.


I am really happy with the outcome and you could easily re-create this with other shades. The top tip I would give is to have at least two blending brushes to hand, as the more you blend the more subtle and flawless the cut crease looks. To keep most of the attention on my eyes, I applied my neutral lipstick from Kiko in 'Pink Carnation', which I posted a full review of here.


What do you think of this look? Have you ever created a cut crease look yourself?

Thanks for reading! Samantha xx

Monday, 21 April 2014

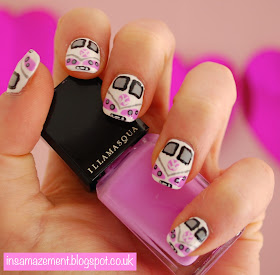
VW Camper Van Nail Art Tutorial

The sun is shining on me through the window and has got me in a summery spirit. Therefore I thought what better nail art look to create than a VW camper van! VW camper vans really remind me of summer and spending time at the beach (something I cannot wait to do in the months to come)! I was inspired to create this nail art look by the amazing Alice from 'One Nail To Rule Them All', and although I could only wish my nail art was as good as her's I gave it a go!


What Will You Need?


All you will need to create this look is nail varnish in white, black, light fuchsia and grey. You will also need a top coat and dotting tools in various sizes.
The nail varnish shades I used are Illamasqua 'Scorch', 'Harem' & 'Boosh', Mavala 'The Elle Grey' and Seche Vite 'Fast Dry Top Coat'. 

Step-By-Step Tutorial:


Step 1: Begin by painting all nails in white. I used two thick coats to ensure the base was opaque.

Step 2: Next using the grey nail varnish to begin with, create two squares at the top of your nail and outline these with black to create the windows.

Step 3: Using the light fuchsia shade dot a large circle under the windows and create the side panelling of the van.

Step 4: Taking the grey nail varnish again, create a 'v' shape under the large circle and above the panelling. Next take the white varnish and create the 'vw' lettering in the badge.

Step 5: Using the black nail varnish, create two dots on each panel and also a small rectangle on the tip of the nail for the number plate. Next taking the grey, create two smaller dots in the centre of the black for the lights, and using white create some detailing in the number plate.

Step 6: Finally once all the above steps are completely dry, go in with a top coat on each nail to seal all the nail art in.

And there you have your VW Camper Van Nails!


What do you think of this nail art? If you recreate this look I would love to see a picture so share it with me by tagging me in your picture on Instagram (@samantha_helen5)!

Happy Nail-Arting! Samantha xx


Saturday, 19 April 2014

A Gorgeous Neutral Lip from Kiko

As some of you may know, Kiko have recently opened a shop just off Oxford Street and whilst I was on Oxford Street doing some shopping this weekend I thought I would take a trip and see what they have to offer. I was on the search for a neutral lipstick shade, which I know sounds crazy as Kiko is amazing for colour products, however I own a lot of bright lipsticks and wanted something a little more toned down, for days when I don't want a bright lip. I found exactly what I was looking for and I am loving my lipstick purchase!


The shade I got was 613 'Pink Carnation'. Kiko had a fab range of neutral lipsticks, from those with a hint of brown, to those with a hint of pink, so you are sure to find the perfect neutral shade for your skin tone. Pink Carnation is a 'Velvet Mat - Satin Lipstick' and therefore has a creamy texture, with the colour intensity and opaque finish of a matte lipstick.


I love the packaging of this lipstick, and it is unlike anything else I have seen from other brands. You push the top of the bullet down, allowing the lipstick to be pulled from the bottom of the tube, and to top it off it gives a very satisfying click when you return the lipstick back into the tube.


When applied to the lips, the colour intensity is perfect for a neutral lip and adds a wash of 'my lips but better' shade, great for any make-up look where you want to keep your lips simple. I am reasonably impressed with the lasting power of this lipstick; the creamy texture means its not designed to stay on the lips all day with out any touch-ups, however the lipstick wears evenly, meaning you don't have to worry about how your lips are looking during a meal or as the hours tick by.


The lipstick also includes K2 Repulp, which stimulates the production of Hyaluronic Acid, helping to keep the lips moisturised. I can't say I can feel this working, however as the lipstick starts to wear off, my lips still feel moisturised and creamy. The lipstick applies to the lips with ease, and the creamy texture allows it to glide on the lips with out dragging.

I can see myself wearing this lipstick lots and at just £6.90 it won't cause a huge dent in my purse if I want to make a re-purchase. You can also browse through and purchase Kiko products online. I also purchased a Nail Varnish, which I will definitely be using in a nail art look soon and I will let you know how I get on with it.

What do you think of this lipstick shade? Whats your favourite neutral shade for your lips? Have you tired anything from Kiko before? Comment below, I would love to hear from you.

Samantha xx

Sunday, 13 April 2014

Neon, Chevron Nail Art Tutorial

As the weather gets warmer and the sun appears, I find myself opting for brighter nail varnishes. Therefore I thought I would create this neon chevron look today with some added glitz using glitter nail varnish, as well as some gems. As always I have put together a step-by-step pictorial, so keep reading to find out exactly how I created this look.


What will you need?


I order to create a similar look yourself you will need a neon pink nail varnish (sorry this isn't in the pictures, I had my nails done this weekend and I forgot to look at the shade name, however I do know it was a Colour Club nail varnish), a dark pink, lilac, white and glitter varnish. You will also need a top coat, some striping tape, a dotting tool and some small gems. 
The nail varnish shades I used were Barry M 'Shocking Pink', Illamasqua 'Harem', 'Scorch' & 'Trilliant' and a Seche Vite 'Dry Fast Top Coat'.

Step-By-Step Tutorial:


Step 1: Paint your nails in the neon pink shade and leave to dry.

Step 2: Apply the striping tape to your ring and middle fingers, ensuring it is pressed down at the edges to avoid the nail varnish leaking.

Step 3: Taking the white, lilac and dark pink shades onto a dotting tool one by one, fill in some of the gaps between the tape.

Step 4: Remove the tape and again using the dotting tool, this time with the glitter varnish, add accents of the glitter along some of the chevrons.

Step 5: Now its time to add the gems to all other fingers. To do this I painted one layer of top coat onto the nail and pressed the gems over the top.

Step 6: Once all nails are dry take the top coat and add a layer to each nail. This will seal in the top coat and gems and prevent chipping!

And there you have your neon chevron nail art with some girly glitz! 


What do you think of this nail art look? What are your favourite shades to wear now the sun is shining? I would love to know your thoughts so leave me a comment below.

Happy Nail Art-ing! Samantha xx

Saturday, 12 April 2014

My Spring Beauty Wishlist

As we enter spring and see lots of new spring beauty brand collections launch, I find my wish list growing and growing. I have pulled out my favourites from my ever growing list of beauty products I plan to purchase (some old products and some new launches), so I thought I would share these with you...


1. The first on my list is the Bourjois Rouge Edition Velvet Liquid Lipsticks which launched very recently. I have seen lots of buzz around these on the blogosphere and I particularly want to try the shade 'Pink Pong' for myself! A gorgeous pop of bright pink is perfect for spring and at just £8.99 I think its worth a try.

2. The second product will not come as a surprise and thats because its a nail varnish and you all know about my love of nail products. I recently saw swatches of the new Barry M Gelly High Shine Nail Paints on some of my favourite nail blogs, and I instantly fell in love with the shade 'Rose Hip'. This is an amazing pale pastel pink and one I would love to add to my collection of Barry M nail products. Priced at £3.99 you can't really go wrong and Im sure its a shade I will incorporate into many of my nail art looks.

3. Third on my wish list is this super cute Mini Brush Set from Real Techniques which are set to launch in May. I LOVE the Real Techniques brushes and this set would be super handy to chuck into your bag and use on the go. The set includes and Mini Foundation Brush, Mini Eyeshadow Brush and a Mini Face Brush; the perfect combo for applying make-up with ease. At just £9.99, I can't wait to get my hands on these when they're released.

4. Flawless make-up which lasts all day long is something which I would love to achieve on a day-to-day basis, as I'm sure most of you would! I have heard great things about the Urban Decay Makeup Setting Spray and because I work 9-5 in London I would love a product that sets my make-up into place for the whole day, with little worry of touching up. The spray comes with quite a high price tag of £20, however hopefully it won't remain on my wish list for too long and arrive in my make-up bag very soon!

5. And last but not least is a product used by many ... Bioderma. I have recently got more into skincare and removing my make-up with more than just a dreaded face wipe is becoming part of my daily routine. Therefore I really want to try Bioderma and being able to get my hands on this for just under £14 online makes it cheaper than some other skincare products I have tried in the past.

Have you tried any of these products yourself? What is on your spring make-up wish list?

Thanks for reading! Samantha xx

Tuesday, 8 April 2014

Water Marbling Nail Art Tutorial

Water marbling on my nails is something which I have tried before and failed. However I didn't want to give in, so I gave it another shot today and I thought I would share some tips and tricks with you as well as a step-by-step pictorial! It is quite a time consuming and messy technique, so you may want to create this look on a few accent nails, as i did, if you are tight for time! Please excuse the state of my nails, I have had a very busy week but I really wanted to get a post up today!


There are two main factors which play a huge part in the success of water marbling, succeed in these and you will end up with a very successful marble nail art:

  1. The water needs to be at room temperature in order to allow the nail varnishes to spread.
  2. The nail varnishes you use need to be fairly new and of a reasonably high quality.

Step-By-Step Tutorial:


Step 1: To begin, ensure you have a container/cup full of water at room temperature, a tooth pick, a selection of nail varnishes in a range of contrasting colours and the nails painted white which you wish to add the marbling to. 

Step 2: Drop a small blob of each nail varnish into the water one by one, letting the first fully expand before you move onto the next colour. Complete this until you have the desired amount of layers.

Step 3 & 4: Using the toothpick create a pattern of your choice. I desired to create a star shape, moving the nail varnishes inwards and outwards to ensure there was a nice mix of colours in the centre. 

Step 5: Drop your finger on top of your marbling, placing it onto the section of your choice. I chose to place my finger in the centre of the star.

Step 6: Blow gently on the surface of the water to dry the remaining nail varnish, then take the toothpick again and sweep up the remains surrounding your finger.

Step 7: Remove your finger slowly from the water.

Step 8: Clean up around your finger to reveal your marbling pattern on the nail. Alternatively you could apply tape to the finger in step 1 in order to decrease the amount of nail varnish needing to be cleaned up around the nail. 

And there you have the technique I use to successfully create a marbled nail using water! 


Have you ever tried water marbling on your nails before? Let me know what you think of this look in the comments below!

Happy Water Marbling! Samantha xx