What will you need?
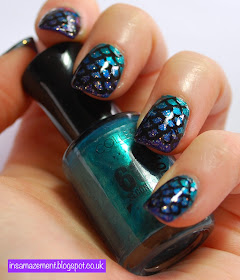
To create this look you will need nail varnishes in dark green, blue and purple as well as a fine glitter varnish and a black. You will also need a top coat, a sponge and a very small dotting tool.
Just in case you were wondering, the nail varnish shades I used are Collection 'Show Off' & 'Bongo Beat'; Barry M 'Vivid Purple'; Illamasqua 'Boosh'; Rimmel 'Glitter Top Coat' and Seche Vite 'Dry Fast Top Coat'.
Step-By-Step Tutorial:
Step 1: Paint all nails in a dark green shade.
Step 2: Taking your blue nail varnish on a sponge, create an ombre effect 2/3 of the way down your nail.
Step 3: Again using the sponge, this time with a purple nail varnish, create another ombre effect 1/3 of the way down the nail.
Step 4: Using the glitter nail varnish apply this over each nail. I applied slightly more near the tip of the nail.
Step 5: Take the black nail varnish onto a dotting tool and create the scales over each nail.
Step 6: Finally once all your nails are dry, go in with the top coat over each nail.
And there you have your mermaid inspired/ fish scale nails.
I hope you like this nail art look! Let me know in the comments below what you think, I love reading all your comments!
Happy Nail-Arting! Samantha xx


I LOVE this tutorial! Such a beautiful pattern! Lovely post :)
ReplyDeleteWow! Your nails are so pretty! I wish I had the patience to do a nail design like this. Danielle xx
ReplyDeletemissdanielle.com
Oh wow this is a really beautiful look! I'll definitely be giving this a try soon x
ReplyDeleteBecky @ The Little Blog of Beauty